Tuesday, October 7, 2014

Creating Simple Weblogic JMS Queues

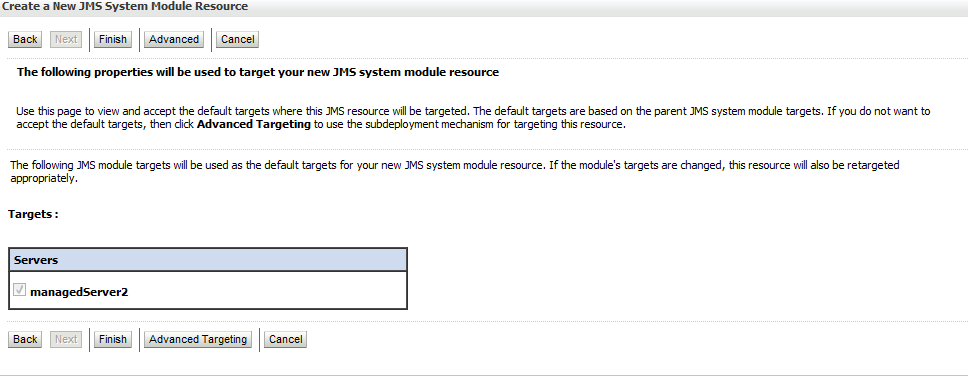
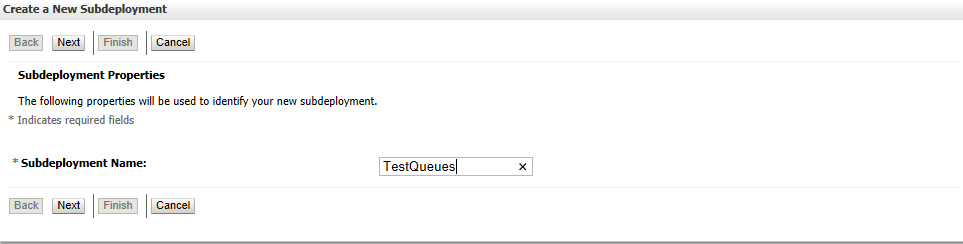
In this post, we'll be seeing how to create a simple JMS queue in Weblogic application server. Based on the queues created in this tutorial, new tutorials will be posted in the future on how to listen and send message to a JMS queue.

1.  Steps to create a JMS Server


4.  Create JMS Queues and Connection Factory

4.1    Create Connection Factory

    Author: Thiagu

Thursday, January 3, 2013

Passing JavaBean Datasource to JasperReports

As the title suggests the tutorial is about passing javabean as a datasource to jasper reports instead of a db connection. To make it work, create a POJO class as below with two variables.

 Than create a generic arraylist of Person and pass it into JasperFillManager as a datasource using JRBeanCollectionDataSource object. Sample code as below.


In the jasper file, just create two String fields as below which has the exact name of the variables in the POJO class.

Run the main file and the output will be as below:


Author: Thiagu

Thursday, December 9, 2010

Reading and Writing Properties


As the title suggests, this post is all about creating and accessing a property file through Java codes. To carry out such activities, 4 important classes have to be used and those are File, Properties, FileInputStream and FileOutputStream.


image

Pic P1: Shows method to write to a .properties file

Pic P1 shows how to write properties to a .properties file. Now lets explore this code line-by-line

  1. Line 26 tries to access a file on the specified file path.
  2. Line 27 checks if the file exists on the specified file path.
  3. Line 28 creates a new file if the file does not exist using createNewFile() method.
  4. Line 35 assigns properties with key and value for the selected file using setProperty() method.
  5. Line 36 writes the properties to the .properties file using store() method.


image

Pic P2:  Shows method to read from a .properties file

  1. Line 49 creates an Input Stream to read from a specific file
  2. Line 50 loads the .properties files using the selected Input Stream
  3. Line 54 extracts the key and key value using the get() method.
  4. Line 56 The Input stream is closed once the stream is not in use.


image

Pic P3: Shows sample code to test read and write methods


image

Pic P4: Shows output of the code in P3


Author: Thiagu

Wednesday, September 29, 2010

How to Get VSS files via Java Code?

Most of the time, to access VSS we’ll either use Command Line arguments or some build scripts from Java. Now, this is actually possible through java codes by using ANT APIs, which does the command line process in the background.

In this post I’m using an example on how to get files from VSS (check-in and check-out will be more or less the same) using ANT API. To make it possible, you need to make use of the “org.apache.tools.ant.taskdefs.optional.vss” package which contains classes to access VSS. Class “MSVSSGET” and some methods of its super class “MSVSS” will be used to carry out the Get process.
Let me explain the code fragment line-by-line:

  1. setLogin – This method is from the abstract class MSVSS used for authentication purpose. The String parameter has to be formatted as “username,password”.
  2. setSsdir – Is also from the class MSVSS which specifies the location of SS.EXE (VSS executable file).
  3. setRecursive – This method is from MSVSSGET class which enables to retrieve all sub-projects of the project specified in VSS path
  4. setProject – This is a method from the superclass ProjectComponent, used to specify a project for the VSS activity.
  5. setServerpath – A method from MSVSS class used to specify the VSS repository’s path (folder which contains the file called srcsafe.ini)
  6. setTaskName - A method from superclass Task used to assign a task name for the VSS activity.
  7. setDescription – A method from superclass ProjectComponent used to specify the description of the activity.
  8. setLocalpath – Method from the class MSVSSGET to assign the location on where to store the files retrieved from VSS.
  9. setVsspath – Method from superclass MSVSS used to assign the project path within the VSS repository. (e.g $/YourProject).
  10. execute – method from the superclass MSVSS used to run the command line argument to execute SS.EXE
For further understanding on the “org.apache.tools.ant.taskdefs.optional.vss” package, kindly refer to this site:

Reference:
Author: Thiagu

Tuesday, August 10, 2010

Setting Initial value for InputDialog in JOptionPane

There are 6 showInputDialog methods in JOptionPane class and we can select either one of these methods based on our requirements. To create an initial value when an InputDialog pops out we need to make use of method with these signatures:
public static Object showInputDialog(Component parentComponent,
Object message,
String title,
int messageType,
Icon icon,
Object[] selectionValues,
Object initialSelectionValue)
throws HeadlessException
Let me describe the parameters in a more understandable way compared to the ones in the Java API Doc.
  • parentComponent - the parent Component for the dialog
  • message – The message to display when the dialog pops out
  • title – The title of the dialog
  • messageType - the type of message to be displayed: ERROR_MESSAGE, INFORMATION_MESSAGE, WARNING_MESSAGE, QUESTION_MESSAGE, or PLAIN_MESSAGE
  • icon – Your very own icon for the dialog
  • selectionValues – Provide few values to select (If this is null, the input field will be a JTextField rather than a JComboBox)
  • initialSelectionValue – The default initial value for the dialog


If you look at the code above, I made the parentComponent as null because the dialog is not referring to any component and I’ve declared the icon null as well because I don’t need a customized icon.

When I declare the selectionValues with an array called values, the input field turns into a JComboBox and the default value is assigned based on the initialSelectionValue, in this case its "A".

Let's say I don't want to provide options to the users and expect them to key in the values manually, but I still want to provide an initial value. All I have to do for that is, make the selectionValues parameter as null.


For further reference, have a look at the javadoc for JOptionPane: JOptionPane

Author: Thiagu

Tuesday, July 13, 2010

String Vs. StringBuffer Vs. StringBuilder


String

StringBuffer

StringBuilder

Mutable

No

Yes

Yes

Synchronized

No

Yes

No

Serialized

Yes

Yes

Yes


When to use these classes?

String – When your text is not going to change
StringBuffer – When your text will be changed by multiple threads
StringBuilder – When your text will be changed by a single thread

Comparison between mutable and immutable objects

String is always considered an immutable class because String objects can't be changed. Usually the "+" or concatenation operator is used to add a character sequence to an existing String variable, but that does not mean its making alterations to the existing object. If you have a look at the example below first a String object is created and then it is concatenated with another String which eventually creates a new object for Str1 to refer to in the memory.


String str1 = "abc"; //1st Object

str1 = str1 + "d"; //2nd Object


The scenario is different for a StringBuffer or a StringBuilder. Once an object is created, it can be changed as many times as possible using methods like append(). If you look at the example below, 1st an object is created and later changes are made to the existing object in the memory using append method.

StringBuffer sbf1 = new StringBuffer("abc"); //1st Object


sbf1.append("d"); //appends "d" to the 1st Object


Author: Thiagu

Monday, July 12, 2010

Updating an existing Trans-SQL Job's interval programmatically

The title itself suggests that the topic about to be discussed now has very little thing to do with Java, but this is something that any Java programmer needs to know when they are working along with SQL Server database.

Let’s look at the scenario now, let’s say you have created a Trans-SQL JOB to run a particular process periodically, but you want to provide the feasibility for the users to change the frequency to run the Trans-SQL JOB from your Java application itself. Now how is that possible? Ya, that’s what we are about to explore now, how to change the frequency from the Java application itself.
First create a JDBC connection as shown below
Once you have created the Connection class, make use of it in the main class to establish the connection with the Database. Create a callable statement where you will call the SQL Server System stored procedure called “sp_update_schedule”. Take note that the parameters assigned below are mandatory parameters for the said Stored Procedure. If you look at the code below, the value of the “schedule_id” is assigned to “10” and “name” is assigned to “null”. This is because either 1 value only should be initialized for “sp_update_schedule” to identify the schedule need to be updated.
For further reference about “sp_update_schedule”, please refer to: http://msdn.microsoft.com/en-us/library/ms187354.aspx

Author: Thiagu

Monday, May 31, 2010

Build your very own Mouse Trap Application

This is a very simple yet interesting concept. I had been seeing such applications being developed right from school kids to working professionals using Microsoft technology for the past few years and wondered how to make it possible in Java. I was actually surprised to know that API’s for controlling mouse cursor had been there in Java since JDK 1.3. Well this shows that nothing is impossible in Java,.....Can anyone deny that...haha.

Now let’s move on exploring this concept step-by-step.

  1. Create a simple User Interface as shown below with 1 JButton. The JButton will used with an action “(System.exit(0))” once the cursor gets trapped within the frame.
  2. Use a MouseListener event on the JPanel and override the mouseExited() Method.
  3. The”if” statement in the OnMouseExit event is used to check if the cursor has went beyond the geographical boundaries of the JFrame. (This validation is done because even if the mouse touches the JButton, it will invoke the JPanel’s OnMouseExit Event).
  4. The next line after the “if” statement shows the usage of Robot API (An API used to control mouse and keyboard automatically. This API was introduced in JDK 1.3).
  5. The Robot API’s moveMouse method will move the cursor according to the X and Y axis that we set. (Here I’ve used the centre point of the JFrame ) .


Author: Thiagu

Wednesday, April 28, 2010

Perform an Event when “Enter” key is pressed

For this month since I had very limited time to come up with a post, I thought of discussing about this common yet simple question that many newbie have in mind.

Let’s say I have a JTextField and a JTextArea and every time when I press the “ENTER” key on the JTextfield, I need to append the text from the JTextField to the JTextArea.

This is a very simple scenario and to accomplish this we have to make use of the “KeyAdapter Class (which implements the KeyListener Interface)” and “KeyEvent Class”.

Once the key “Enter” is pressed we need to perform the action, so at this point we need to make use of the “keyReleased(KeyEvent evt)” method from the adapter class and then check if the keycode is equals to “evt.VK_ENTER”. The code snippets are as below.

For further reference and study kindly refer to this link http://java.sun.com/docs/books/tutorial/uiswing/events/keylistener.html

Author: Thiagu
Tuesday, March 30, 2010

Enabling a Row or a Column Selection in JTable (SWING)

In this example I’m going to discuss about how to select one whole row or a column when a cell in a JTable is clicked. It’s not something hard, since it just requires 3 lines of code to be included. Follow the steps below to make it happen.
Steps:
  1. Since we are just going to select one particular row or column in a JTable, the selection mode has to be set as Single selection using the constants in ListSelection Model Interface. E.g: jTable1.setSelectionMode(ListSelectionModel.SINGLE_SELECTION);
  2. If row selection is to be enabled, set the row selection method as “true” and column selection method as false”. Code snippet and output are as below.

  3. If column selection is to be enabled, set the row selection method as “false” and column selection method as “true”. Code snippet and output are as below.

Author: Thiagu
Saturday, February 27, 2010

Rendering ComboBox in a JTable (SWING)

Ever wondered how to make a cell in a JTable to render a JComboBox? This example will guide you on that. The scope of this tutorial does not have to be limited to combobox, the same concept applies in rendering other components in a JTable.
  1. Create a JTable with two columns as shown below.
  2. Create an inner class that implements TableCellRender as below
  3. Set the particular column's renderer as the renderer class that you have created
  4. Create a JComboBox variable with the necessary values and pass it as a parameter to the constructor of the DefaultCellEditor class
  5. WALLA....there’s your combobox, right where you want it...


Author: Thiagu
Tuesday, February 9, 2010

Changing JLabel’s background during mouse over (SWING)

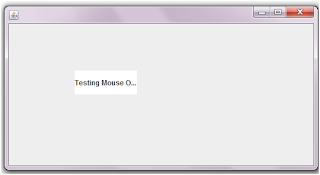
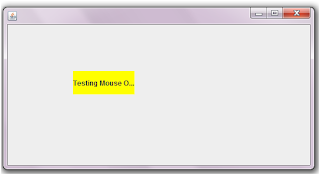
Let’s look at how to change the background colour of a JLabel (by default is transparent) when the mouse cursor moves over it.

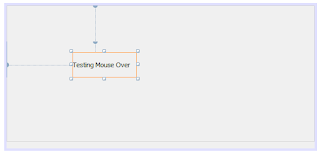
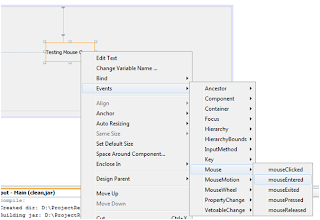
1. Create a JLable as above on your application using Netbeans IDE
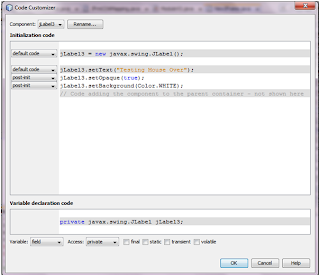
2. Include the code snippet below to change the background colour of the JLabel.


3. As you can see in the code, JLabel3.setOpaque(true) line is used because by default a JLable will have a “false” value for the Opaque which makes the background transparent.
4. Once the Opaque is set to true, change the background colour.

5. Select the mouse entered action, which provides an action when the cursor gets into the boundaries of the JLabel.
6. Include the code snippet below to change the colour of the JLabel during mouse over.

Results:

Before Mouse Over


After Mouse Over

Author: Thiagu

Wednesday, February 4, 2009

Setting Session Timeout (J2EE)

There are two ways of setting session timeout in Java. One is by utilizing the deployment descriptor and the other is by calling setMaxInactiveInterval() under HttpSession interface.

Using Deployment Descriptor:


Setting time-out at the deployment descriptor gives impact to the whole web-application. Looking at the example above, the session for the whole web application will terminate in 5 minutes (note: In deployment descriptor the time used for the timeout is measured in minutes)


Using setMaxInactiveInternal() :

HttpSession session = request.getSession() ;
session.setMaxInactiveInterval( 5 * 60) ;

The difference between using setMaxInactiveInterval() in a program and using in deployment descriptor are:

  • setMaxInactiveInterval() method will only cause session time-out for a particular session instance and not the whole web-application.
  • Other than that in setMaxInactiveInterval() method, time is measured in seconds not minutes. Take a look at the code above, to reach 5 minutes expiry (5*60) is used.

Author: Thiagu
Thursday, January 15, 2009

Interfaces in JAVA (Java Fundamentals)

An interface is similar to Abstract classes but the only difference here is an interface cannot have any code implementation within it's body. Interfaces serves as a prototype for the whole project, so that all the clasess implementing an interface would override the methods in it.

Here are the features and rules of an Interface:


  1. Interface can only be declared with public or default access modifiers
  2. Any method declared within an Interface is "public abstract"
  3. Any method declared within an interface should not have code implementations
  4. Any variables declared within an Interface is "public static final", in other words all of them will be constant values.
  5. A sub-class that does not override an Interface method/s should be declared abstract.
  6. An Interface can implement several interfaces.
  7. "extends" keyword is used for an interface to implement another interface

Let's take an example to figure out how actually an interface works. Let's expand the previous example "The Car Scenario". Now what are the common features of a Vehicle? Every modern Vehicle will have it's own engine, color and maximum speed (kmh). This feature will vary in accordance to the type of Vehicle. An economic car could have 4 seats, metalic or non-metalic color, and etc. Have a look at this code to see how actually interfaces are implemented for the Economic car.


interface Vehicle {
int engine() ;
int speed() ;
}

interface Color
{
String colorType() ;
boolean isMetalic() ;
}

interface Car extends Vehicle, Color
{
int numSeats() ;
}

public class EconomicCar implements Car
{
public int engine()
{
int cylinder = 6 ;
return cylinder ;
}

public int speed()
{
int maxSpeed = 200 ;
return maxSpeed ;
}

public String colorType()
{
String color = "black" ;
return color ;
}

public boolean isMetalic()
{
boolean metalic = true ;
return metalic ;
}

public int numSeats()
{
int seats = 4 ;
return seats ;
}
}


Every car will have it's own engine, color and max speed so, the Car interface implements both Color and Vehicle interface. The Car interface has it's own abstract method called numSeats beacuse number of seats vary for different type of cars. The sub-class of the whole hirearchy is EconomicCar, and this sub-class has to override all the abstract methods of it's super-classes.


Author: Thiagu
Sunday, January 11, 2009

Abstract Classes and Abstract Methods (Java Fundamentals)

You have to know two important concepts for this part. One is Abstract classes and the other is Interface. Depends on the nature of the project, you need to set certain level of standards and rules that the other developers must follow. This is where Abstract classes and Interfaces come into picture. Abstract classes are usually used on small and big time projects, where it can have code implementation like general classes and also declare Abstract methods (empty methods that require implementation from the sub-classes). Abstract methods usually serves as a prototype to developers.

Lets take an example of a Car, every car has seats but the number of seats vary based on the type of car. A sports car will have 2 seats and an economic family car has 4 seats. At this point the common feature for every car are seats, so we need to create an Abstract class called Car and an abstract method called seat. Than we can create 2 sub-classes called SportsCar and EconomicCar that will override the seat method of Car class.


public abstract Car{
public abstract int seat() ;
}

public class SportsCar extends Car{
public int seat()
{
int seat = 2 ;
return seat ;
}
}

public class EconomicCar extends Car{
public int seat()
{
int seat = 4 ;
return seat ;
}
}


Here are the rules of an Abstract class and method:

  1. Abstract classes cannot be instantiated
  2. Abstract class can extend an abstract class or a concrete class and implement several interface classes
  3. Abstract class cannot extend an interface
  4. If a class contains Abstract method, the class has to be declared Abstract class
  5. An Abstract class may or may not contain an Abstract method
  6. Abstract method should not have any code implementations, the sub-classes must override it (sub-class must give the code implementations).
  7. If a sub-class of an Abstract class does not override the Abstract methods of its super-class, than the sub-class should be declared Abstract also.
  8. Abstract method cannot be declared with any other non-access modifiers such as static, final, native, transient, volatile
  9. Abstract classes can only be declared with public and default access modifiers.
  10. Abstract methods can only be declared with public, default and protected modifier.


Author: Thiagu

Java Modifiers (Java Fundamentals)

There are two types of modifiers in Java one is Access modifiers and the other is Non-access modifiers.

Examples of Access Modifiers are:


  1. private
  2. public
  3. protected
  4. Default (Package)

Examples of non-access modifiers:


  1. static
  2. final
  3. abstract
  4. synchronized
  5. native
  6. transient
  7. volatile
Some developers or lecturers do term access modifiers as access specifiers but the official name used on books and SUN Microsystem is "Access Modifiers"


Author: Thiagu